



Connecting a Factory Amplifier to an Android Head Unit
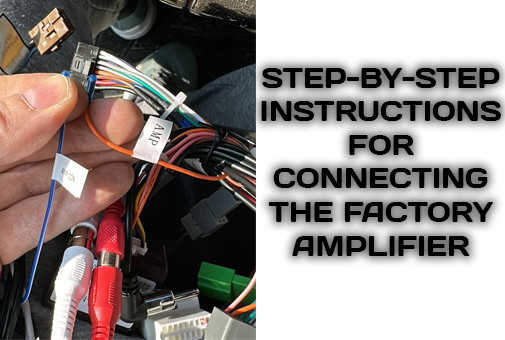
In this guide, we will break down the exact algorithm for physically wiring the RCA line-level outputs and the AMP-CON control signal, as well as the mandatory software activation of the amplifier in the CAN-bus settings and the Android system.
When replacing the factory radio with an Android head unit in vehicles equipped with premium audio systems (JBL, Harman Kardon, Rockford Fosgate, Bose, etc.), owners often experience no sound after connecting the main harnesses. An error during wiring or software configuration can lead to silence in the speakers, background interference, or improper operation of the factory subwoofer.
Quick Summary
- Audio Signal: Transmitted from the head unit to the factory amplifier via the low-level line outputs FL OUT / FR OUT (RCA).
- Amplifier Power: Triggered by supplying a +12V control signal via the AMP-CON wire (blue or blue-and-white).
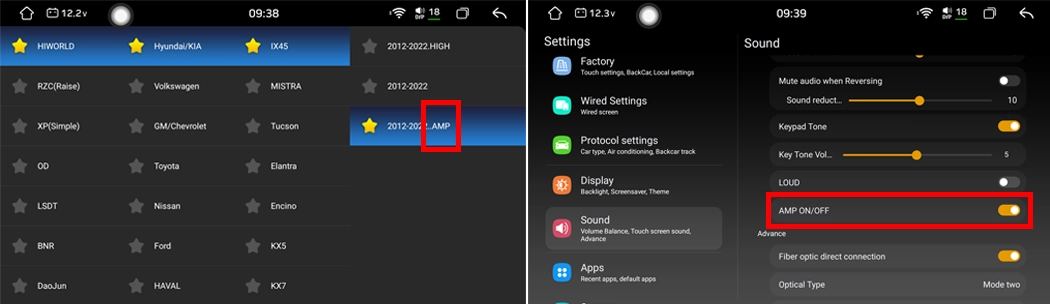
- Software Activation: Without selecting a profile with the AMP suffix in the CAN-bus factory settings and turning on the Amplifier Power toggle in the sound menu, the factory amplifier will remain in sleep mode.
- Result: Clean, distortion-free sound with full retention of factory channels, balance, and subwoofer.
Comparison of Audio System Connection Architecture
Understanding the differences between the factory head unit and SMARTY Trend systems helps avoid common mistakes during DIY installation:
| Criterion | Factory Head Unit (OEM) | SMARTY Trend Android Head Unit |
|---|---|---|
| Audio Signal Transmission | Internal digital bus or proprietary analog protocol | Standardized line-level outputs RCA (FL OUT / FR OUT) |
| Amplifier Startup | Built-in command via the factory CAN-bus when ignition is turned on | Combination of a +12V (AMP-CON) trigger and a CAN profile with the AMP index |
| Sound Processing | Rigid factory presets without deep customization options | Built-in DSP processor with crossover, equalizer, and time alignment adjustments |
| Installation Diagnostics | Requires a dealership diagnostic scanner | Step-by-step verification of contacts and software toggles in the menu |
Step-by-Step Connection and Setup Guide
Follow these three sequential stages to properly launch the factory audio system.
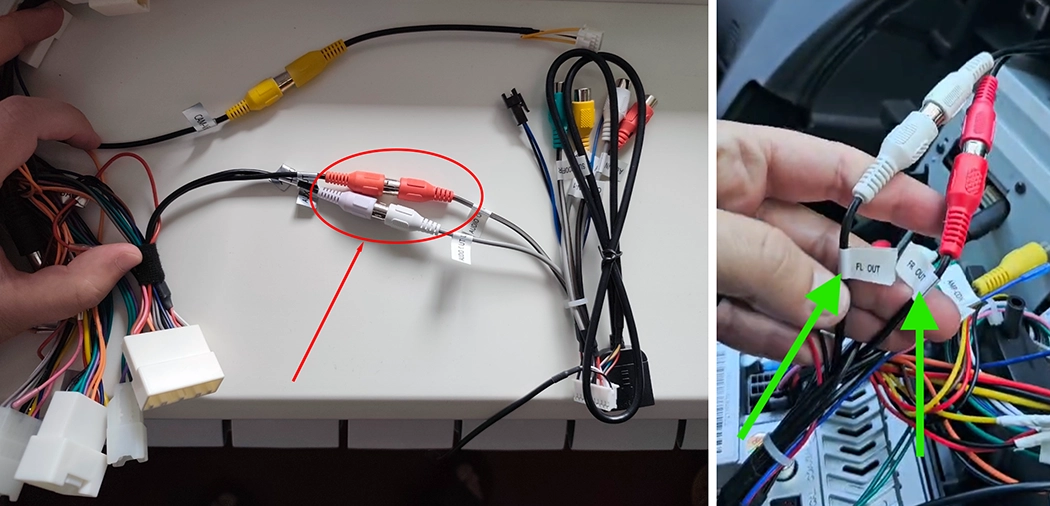
Stage 1. Connecting RCA Audio Channels (FL OUT / FR OUT)
Line-level outputs transmit a clean low-level signal from the head unit's audio processor to the input of the factory power amplifier.
- Locate the line-level outputs labeled FL OUT (white plug) and FR OUT (red plug) on the main wiring harness of the head unit - in some harness revisions, they may be labeled as AUDIO OUT L / R.
- Connect them to the matching RCA jacks coming from the vehicle's power harness or CAN-bus adapter, strictly following the color coding (red to red, white to white).
- Verification: Ensure the plugs are pushed firmly all the way in with no play that could cause background noise or channel dropouts over bumps.
Stage 2. Wiring the Control Wire (AMP-CON)
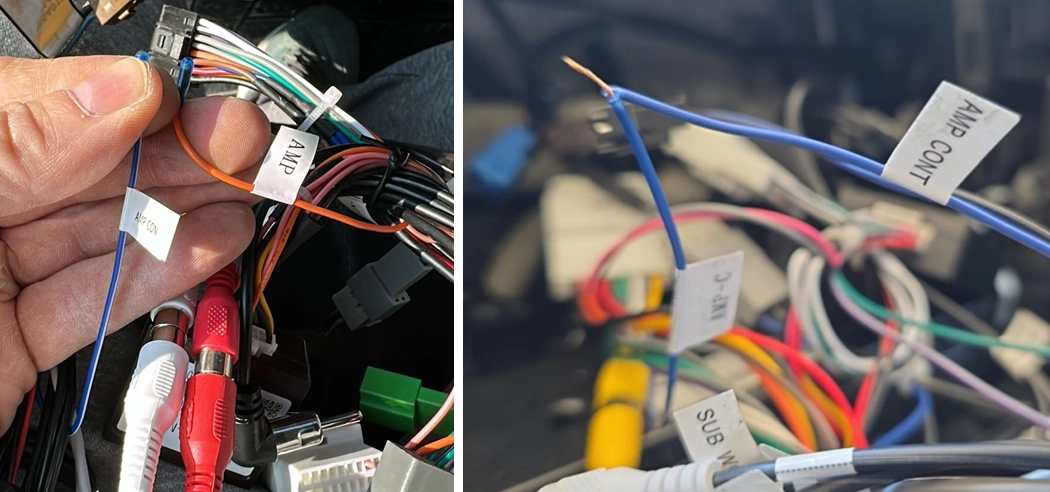
Without a control voltage signal, the factory amplifier will not exit standby mode, even if the RCA audio cables are connected properly.
- Locate the single wire (usually blue or blue-and-white, occasionally orange) tagged AMP-C, AMP-CON, or AMP coming from the CAN-bus decoder plug or main vehicle power connector.
- Join it via twist-and-tape or a crimp sleeve to the corresponding AMP CONT (or ANT_CONT) control wire coming from the head unit to supply the +12V trigger signal.
- Verification: The connection must be securely fastened and fully insulated with heat-shrink tubing or electrical tape with no exposed copper strands.
Stage 3. Activating the Amplifier in Android and CAN-bus Settings
Physical wiring alone is not enough - you must enable software control of the amplifier in the system.
- CAN-bus Profile Selection: Go to the vehicle's engineering menu (Factory Settings - Model / CAN Selection) and ensure your car model configuration is selected with the mandatory AMP (Amplifier) suffix in its name.
- System Sound Menu: Open the main head unit settings via Settings - Device - Sound - Amplifier Power and switch the toggle to ON.
- Verification: After saving the CAN-bus profile and enabling the toggle, clean, balanced sound without crackling or delays should play through the speakers.
Frequently Asked Questions (FAQ)
1. All connectors are plugged in, but there is no sound from the speakers. What is the reason?
In 90% of cases, the issue is caused by a missing control signal or an incorrect CAN profile. Check with a multimeter for +12V on the AMP-CON wire with the ignition on, and verify that the car profile with the AMP suffix is selected in the Factory Settings menu.
2. There is a background hum, alternator whine, or popping noise when turning on. How do I fix it?
Check that the FL OUT / FR OUT plugs are firmly seated and ensure the RCA signal cables are not routed tightly against the vehicle's main power wires. Also verify a solid connection on the head unit's ground wire (GND).
3. Do I need to connect the rear RL OUT / RR OUT channels if there are only two connectors on the harness?
Most CAN-bus controlled factory amplifiers receive a base stereo signal via the front FL OUT / FR OUT pair, while sound distribution across front, rear, and subwoofer channels is handled by the amplifier's own built-in processor.
If your vehicle has a non-standard audio system or you need to confirm the connector pinout for your specific trim level, SMARTY Trend technical support engineers will help you select the right CAN adapter and advise you before purchase.
Android Head Units on UIS 7870 FAQ: Service Codes, Settings, and...
Zero-Loss Upgrade: How to Install an Android Head Unit and Retain...

Why Wireless CarPlay Keeps Disconnecting (And the Real Fix)
Top Mistakes When Choosing and Buying an Android Car Stereo:...
How to Choose RAM and ROM for an Android Car Stereo: 4+64, 6+128,...
 EN
 DE
 ES
 FR
 IT
 NL
 PL
 PT
 RU