




Jaguar XJ (X351) 2010–2020 Android Head Unit Installation: Step-by-Step Guide
Step-by-step guide for installing the SMARTY Trend 10.25-inch Android head unit in Jaguar XJ/XJL (X351) 2010-2020. Retain full OEM menu functionality, climate controls, and Meridian audio system.
Installing a SMARTY Trend Android multimedia head unit in an executive Jaguar XJ / XJL (X351, 2010-2020) sedan allows you to fully modernize the outdated factory Bosch or Harman system. You get a modern 10.25-inch IPS/QLED touchscreen display, wireless Apple CarPlay, Android Auto, real-time navigation, and access to Google Play apps. At the same time, all factory functions-from the original OEM interface and climate control to the 360-degree camera system and Meridian / Bowers & Wilkins audio-are 100% preserved.
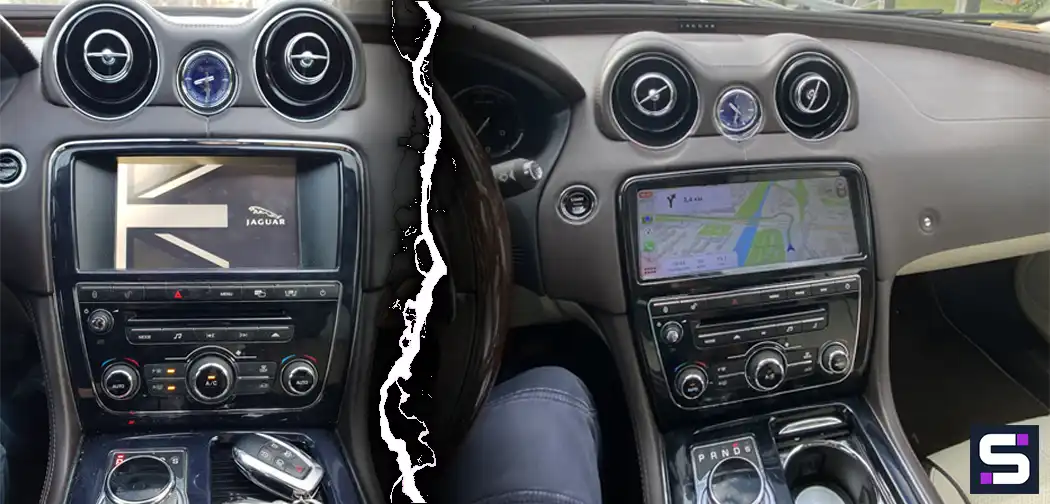
Technical Specifications of SMARTY Trend System for Jaguar XJ (X351)
The upgraded head unit system is designed for seamless integration into the sedan's interior while preserving the premium aesthetic of the original dashboard.
| Parameter | Value / Feature |
|---|---|
| Car Compatibility | Jaguar XJ / XJL (X351 body) 2010-2020 |
| Factory Platforms | Bosch / Harman (depending on model year) |
| Display | 10.25" HD IPS / QLED capacitive touchscreen (1920x720) |
| Wireless Modules | Apple CarPlay, Android Auto, Wi-Fi, 4G LTE, Bluetooth |
| Audio Routing | Integration with factory DSP via AUX channel |
| Retained Features | OEM interface, climate control, steering wheel buttons, original 360° cameras |
Preparation and Pre-Installation Diagnostics
Before starting any electrical work, make sure to disconnect the vehicle's power supply by disconnecting the negative battery terminal located in the trunk.
Required Tools:
- Plastic trim removal tools to prevent damage to leather and high-gloss panels.
- Torx T20 / T25 screwdrivers for the climate control panel and display fasteners.
- Phillips screwdriver (PH2) to work with the original screen housing.
- Protective cover or microfiber towel to prevent scratches on the gear selector.
Factory System Variations
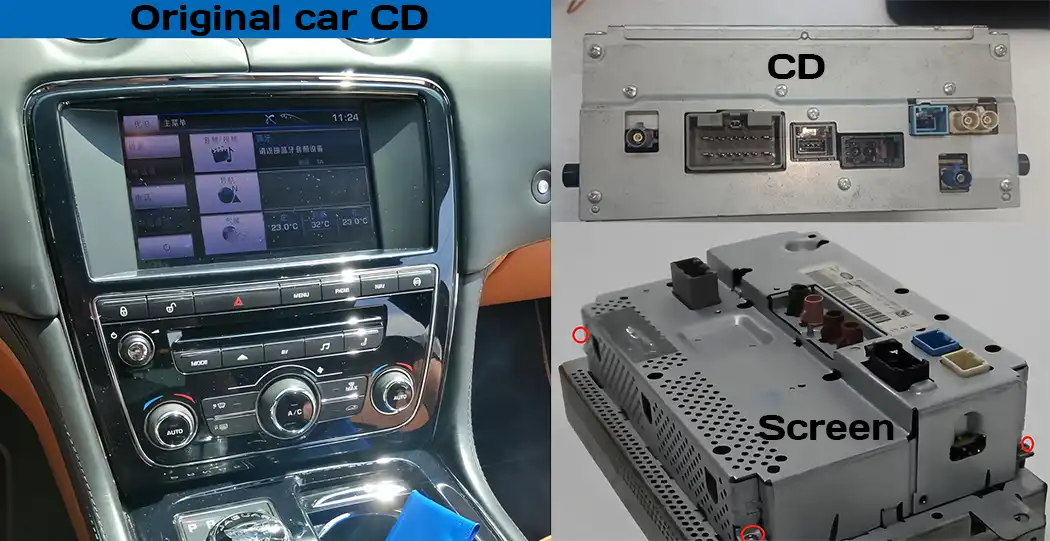
Pay close attention to the rear connections of the OEM screen and CD drive. Port configurations may differ depending on the production year.
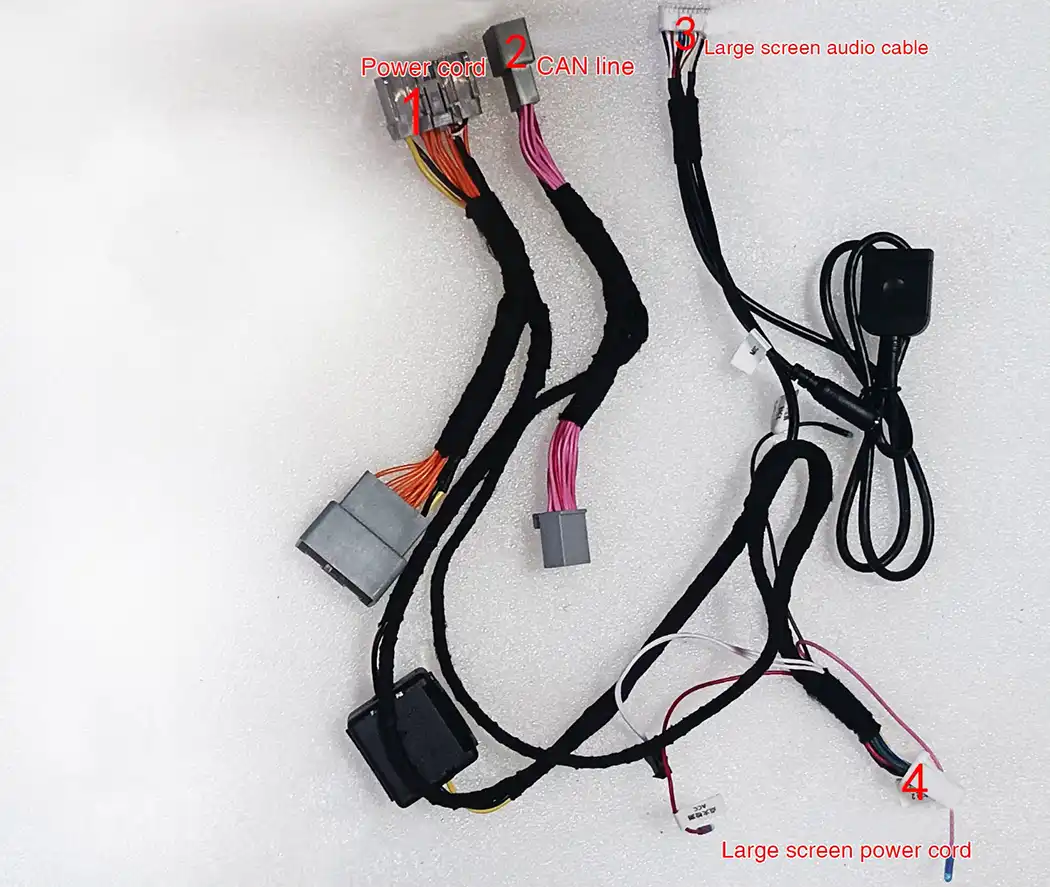
SMARTY Trend Wiring Harness Specifications
The system is connected using a Pin-to-Pin standard. The included wiring harness matches the factory Jaguar wiring perfectly, eliminating the need for wire cutting or soldering.
Step-by-Step Installation Guide
Step 1: Removing the Screen Trim and Climate Control Unit
Using a plastic trim tool, carefully pry off the decorative trim surrounding the factory screen. Once the clips are released, remove the screws securing the climate control unit and screen assembly.
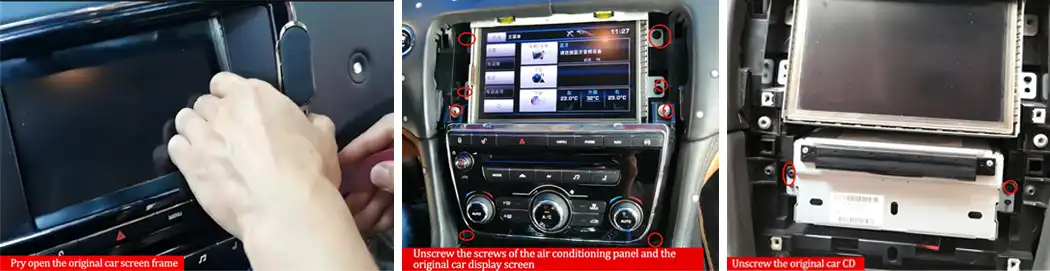
Step 2: Removing the CD Drive and Cable Routing
Remove the climate control module and unscrew the two mounting screws of the lower CD host unit. Connect the main power harness and CAN line in series with the factory CD drive connector, then route the power and audio cables up to the main display cavity.
Step 3: Transferring the Original Screen Motherboard
To preserve full functionality of the factory Jaguar menu, air suspension settings, and climate controls, the original motherboard must be transferred from the factory screen into the supplied SMARTY Trend protective housing.
- Disassembly: Disassemble the original display housing and carefully remove the main PCB board.
- Connection: Attach the flexible ribbon cable from the new head unit to the factory board header.
- Securing: Secure the motherboard inside the provided metal protection box.
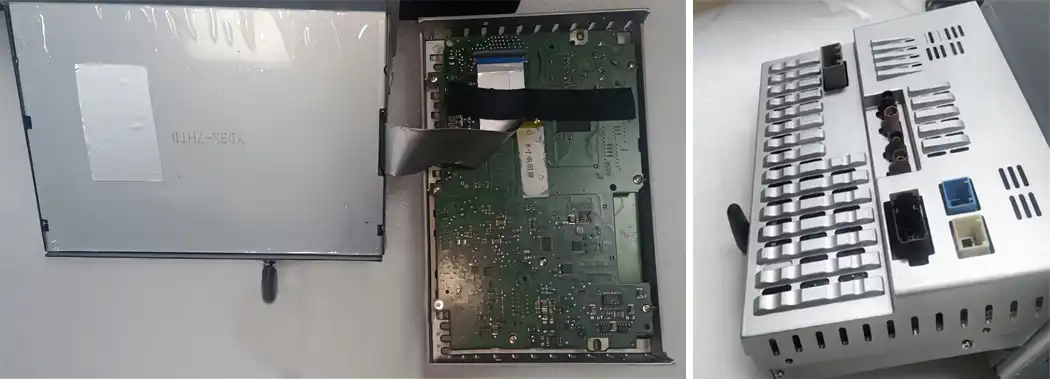
Step 4: Testing and Reassembly
Connect the GPS/4G antennas, USB ports, and main wiring harnesses to the new 10.25-inch display. Reconnect the battery negative terminal and verify system performance before final dashboard reassembly:
- OEM Menu: Confirm smooth switching to OEM mode and check factory menu controls.
- Audio System: Verify sound output through the AUX channel to the Meridian audio setup.
- Cameras & Steering Controls: Engage reverse gear to verify parking camera displays and test steering wheel button responses.
Frequently Asked Questions (FAQ)
Will the original Jaguar factory menu be retained after installation?
Yes, the system operates in a dual-mode configuration. You can instantly switch between the original Jaguar interface and the Android environment at any time.
How is audio routed to the Meridian / Bowers & Wilkins sound system?
Audio output from navigation, apps, and Apple CarPlay is routed directly into the factory amplifier via the original AUX input channel without quality loss.
Does the vehicle require coding or dealer software configuration?
No, the system is fully configured for Jaguar XJ (X351) vehicle electronics and operates on a Plug & Play basis without dealer diagnostic tools.


| Operation system: | Android 13 |
| Display: | 10.25 inches QLED |
| Resolution: | Full HD Ultra-wide (1920x720 px) |
| Processor: | 2.0 / 1.6 Ghz Octa-core (UIS7862 / 8581A) |
| RAM + SSD: | 2+32 / 4+64 / 8+128 Gb |
| Car link: | Wireless Apple CarPlay & Android Auto |
| Free gift: | DVR with ADAS / TPMS / HD Rear Camera |

| Operation system: | Android 13 |
| Display: | 10.25 inches IPS |
| Resolution: | Full HD Ultra-wide (1920x720 px) |
| Processor: | 2.0 GHz Octa-Core (Snapdragon 665) |
| RAM + SSD: | 8+64 / 8+128 Gb |
| Car link: | Wireless Apple CarPlay & Android Auto |
| Free gift: | DVR with ADAS / TPMS / HD Rear Camera |
CarPlay vs Android Auto in 2026: Which One to Choose For Your Phone...

Android Head Unit Processors Guide 2026: Snapdragon vs. UIS Full...

Does installing an Android screen or digital dash affect the MOT?

Digital Instrument Clusters by SMARTY Trend: The Ultimate Virtual...

The Evolution of Comfort: How to Choose a Premium Android System...
 EN
EN DE
DE
 ES
ES
 FR
FR
 IT
IT
 NL
NL
 PL
PL
 PT
PT
 RU
RU
 WhatsApp