


How to Set Up CanBus on Android Car Radio: Step-by-Step
A step-by-step guide to identifying, configuring, and troubleshooting the CanBus adapter on an Android car stereo.
How to Set Up CanBus on an Android Car Stereo: Step-by-Step Instructions, Manufacturer Selection, and Troubleshooting
When replacing a factory car stereo with a modern Android head unit, car owners often find that some vehicle functions do not work "out of the box." Steering wheel buttons don't react, climate control data, parking sensors, or dynamic parking lines aren't displayed. A special module is responsible for integrating the stereo with the car's onboard system – the CanBus adapter (commonly referred to as a "can module" or "can box").
In this article, we will break down in detail how to correctly identify the manufacturer of your adapter, configure it in the system, and what to do if something goes wrong.
How to Tell If You Need a CanBus Adapter
A CanBus adapter is required if your car communicates with peripherals via a digital CAN bus. Determining its presence is simple:
- External module: A separate plastic or metal box of black, burgundy, blue, or gray color hangs on the main wiring harness.
- Built-in module: The integration chip may be initially embedded into the board of the dash kit frame, control joystick, or climate control unit.
Important engineer's note: If your car is an older model year or from a budget segment, digital bus control might not be present. In this case, the steering wheel buttons work via an analog signal (Key 1 / Key 2) and are configured directly through the stereo's standard application.
Step 1. Identify the CanBus Adapter Manufacturer
Before diving into the settings, you need to physically look at the adapter itself. There are many brands on the market, and choosing the wrong profile in the menu is the most common reason why the stereo "doesn't see" the car.
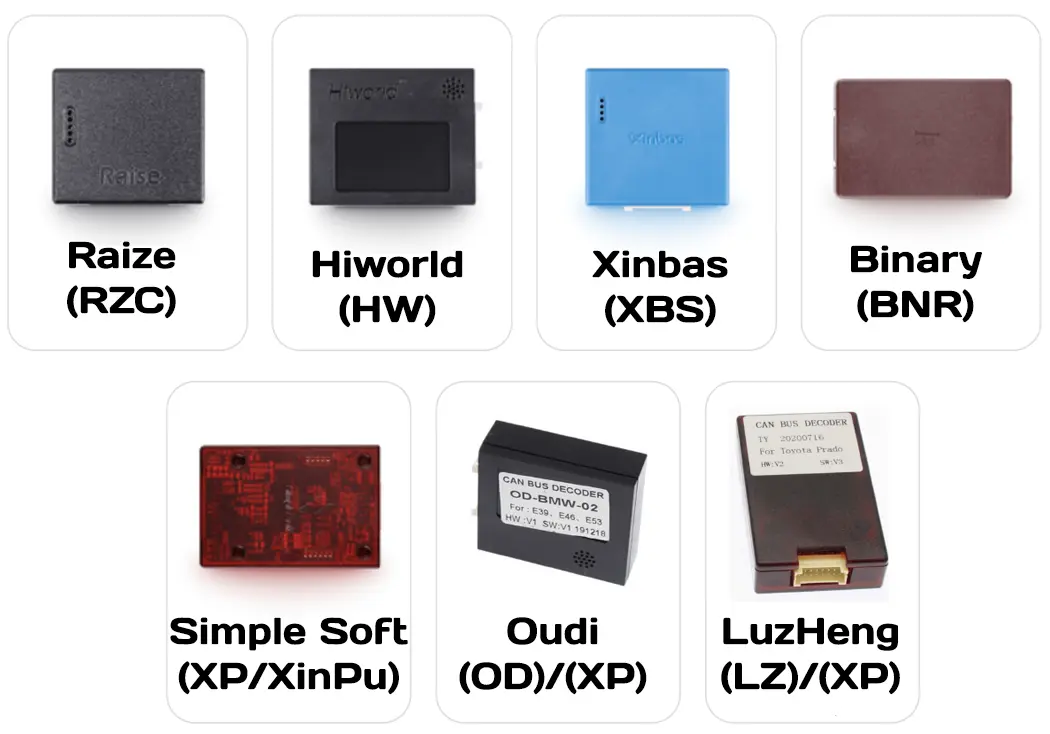
Pay attention to the logo or abbreviation on the module's sticker:
| CanBus Manufacturer | Menu Labeling | Features / Notes |
|---|---|---|
| Raise | RZC |
Matte black plastic body. |
| Hiworld | HW |
Glossy or semi-matte black body with a characteristic recess. |
| Xinbas (Xinbai) | XBS |
Bright blue plastic body. |
| Binary | BNR |
Burgundy or dark brown plastic. |
| Simple Soft | XP / XinPu |
Transparent dark red plastic. |
| Oudi | OD |
Black body with a sticker. Sometimes works stably on the XP protocol. |
| LuzHeng | LZ |
Compact brown body. Sometimes launches under the XP protocol. |
Step 2. Step-by-Step Configuration Algorithm in the Android Menu
Once the box manufacturer is identified, move on to the software setup. Interfaces may slightly differ depending on the firmware, but the general logic is identical everywhere:
- Turn on the car's ignition.
- Go to stereo Settings → Factory.
- Enter the service password:
3368. - Find the CanBus Setting item.
- Set the configuration strictly by columns:
- 1st column: Adapter manufacturer (e.g., Raise, Hiworld, Simple Soft).
- 2nd column: Car make.
- 3rd column: Car model.
- 4th column: Year of manufacture or trim type.
Understanding Trim Level Markings:
When selecting the final item, you will see letter indices. They are critically important for the correct activation of functions:
- L - low/base vehicle trim level.
- M - medium trim level.
- H - high/premium trim level.
- AMP - configuration with the original factory sound amplifier.
Lifehack from an engineer's experience: If your car model or required year of manufacture is not on the list, don't panic. Electronics manufacturers group cars by hardware platforms. Select a sister-platform model (for example, VW settings often work for Skoda, Ford settings of similar years work for some Mazda models, etc.).
After selecting the parameters, settings are saved automatically. In 90% of cases, functions are activated immediately, but some platforms require rebooting the head unit via the Reset button, the power-off menu, or even by removing the positive terminal of the car battery.
Troubleshooting Guide
If the system does not work correctly after configuration, use this expert problem-solving map:
Problem 1: The stereo doesn't see the CanBus (steering wheel, climate, etc., do not work)
- Software error: The CanBus manufacturer or car model was selected incorrectly (double-check the markings on the box).
- Hardware reboot: Perform a full reset/reboot of the head unit (don't just turn off the screen, restart Android completely).
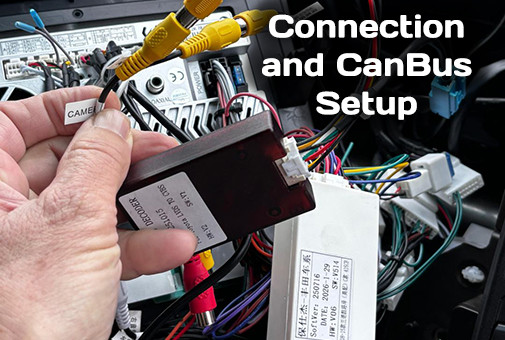
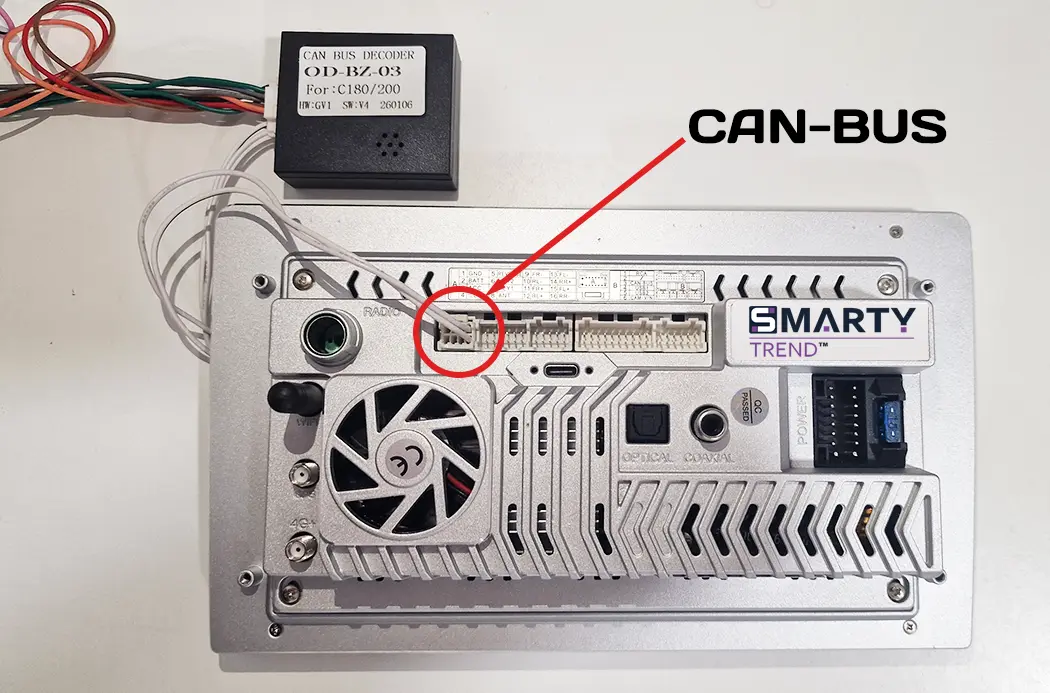
- White plug (CAN connector): Ensure that the small white plug with two intertwined wires (usually a green, brown, or blue twisted pair) coming from the main wiring harness is physically plugged into the corresponding small socket on the back of the stereo.
- Connector repinning: In rare cases, factories mix up the data wires. Try swapping the two wires (CAN-High and CAN-Low) in the specified white plug, or check their correspondence on the car's original connector.
- Adapter power supply: Make sure the ignition is turned on. If the Can module shows no signs of life, check whether +12V power (usually the yellow wire) and ground (black) are reaching it.
Problem 2: The stereo does not display the full CanBus functionality
- Trim limitations: Your car's hardware does not fully support the CAN bus (some data is not transmitted to the general network).
- Inaccurate protocol: Try choosing a different CanBus manufacturer in the settings (for example, choose Hiworld instead of Raise, or vice versa). Often, different adapter manufacturers use alternative reverse-engineered codes for the same cars.
Problem 3: Everything works, tracks change, but there is no sound in the speakers
- Check the profile index: In the CanBus settings, select the car configuration with the mandatory "AMP" prefix.
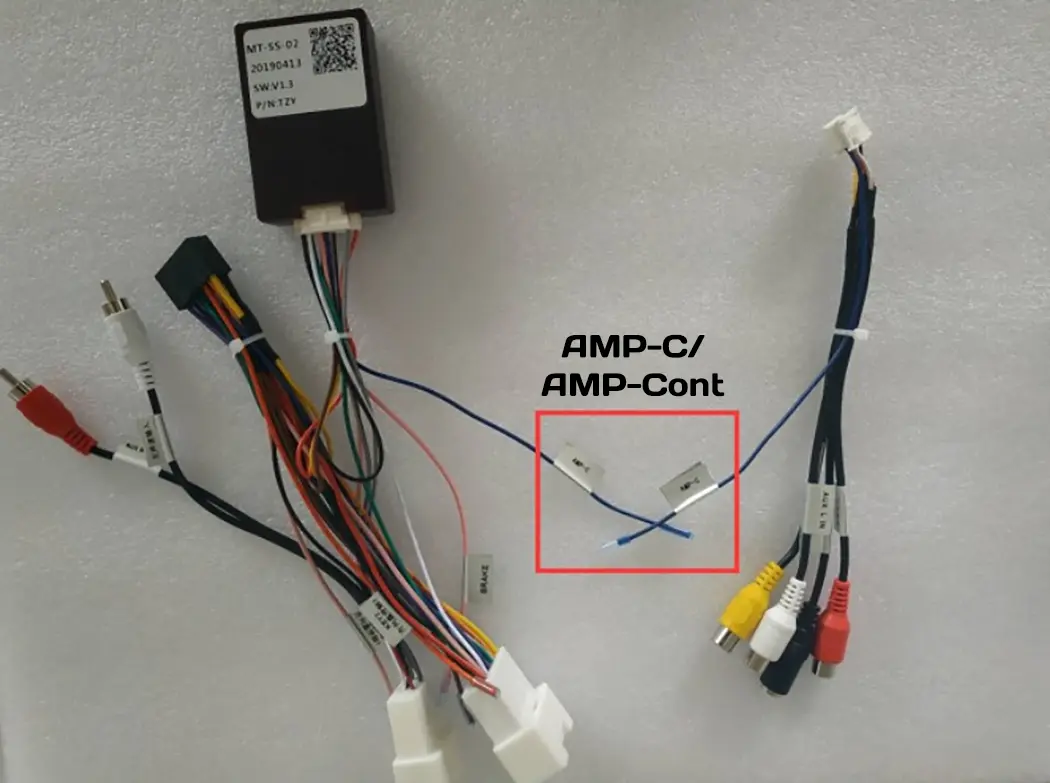
- Forced power (REMOTE / AMP-CON): Find a single wire with a blue or blue-white stripe and an AMP-C or AMP-Cont tag on the wiring harness coming out of the Can adapter. It is necessary to forcibly apply 12 volts to it (connect it to the corresponding amplifier control wire from the stereo).
- System settings: Go to the main menu: Settings → Device → Sound → Amplifier Power and toggle the switch to the ON position.
Conclusion
Proper integration of the head unit with the car's CAN bus ensures long and comfortable operation of your multimedia system. The main things are attentiveness during visual identification of the module and understanding your car's trim level features.
Car Screen Evolution: QLED vs IPS, 2K & 12.5-Inch Interior Trend
How Android Head Units Connect to CAN-Bus Without Car Errors
Guide to Integrating Rearview Cameras and 360° Systems with Modern...

How to Connect and Configure Steering Wheel Buttons on a SMARTY...

Android Head Unit vs. Factory Radio: Is It Worth Upgrading in 2026?